It was a sunny, autumn, crisp winter, summer morning, as I sipped on my pumpkin spice ….jk jk

Step 1: Measure.
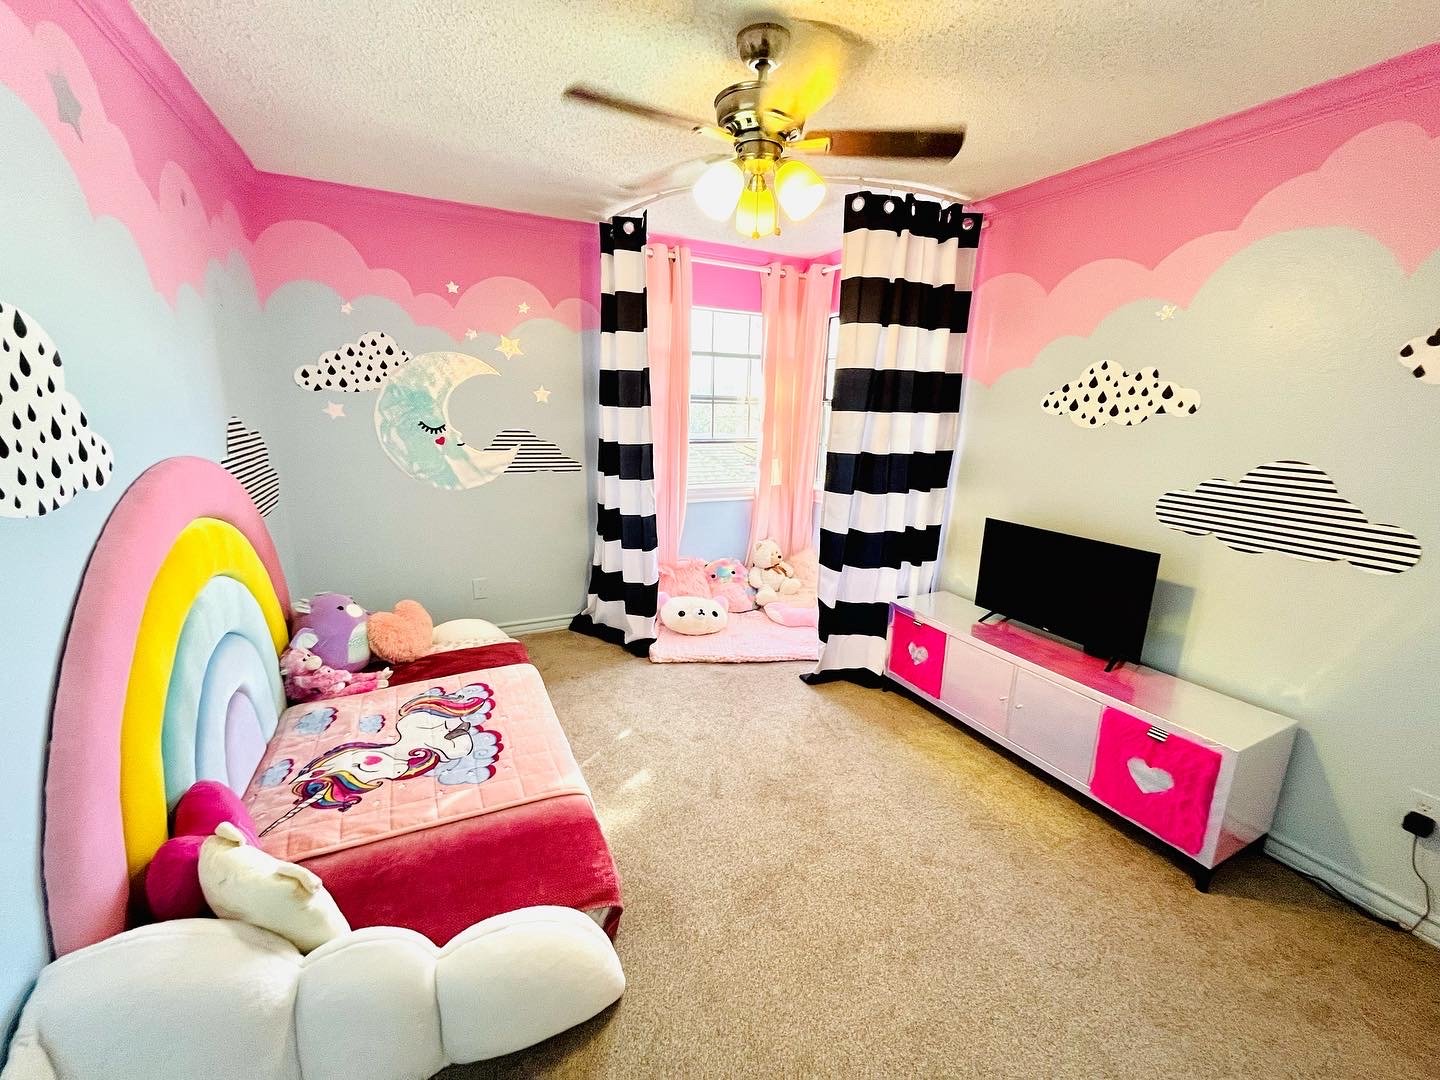
I wanted it to span the width of a US twin bed: 75 inches.
Half 37.5” is the midpoint, so that is the length of the protractor, string or ruler needed to draw the circle.
I cut a 1” piece of cardboard 1.So I could ensure equal increments. 2. No stretching or twisting up like string will do.
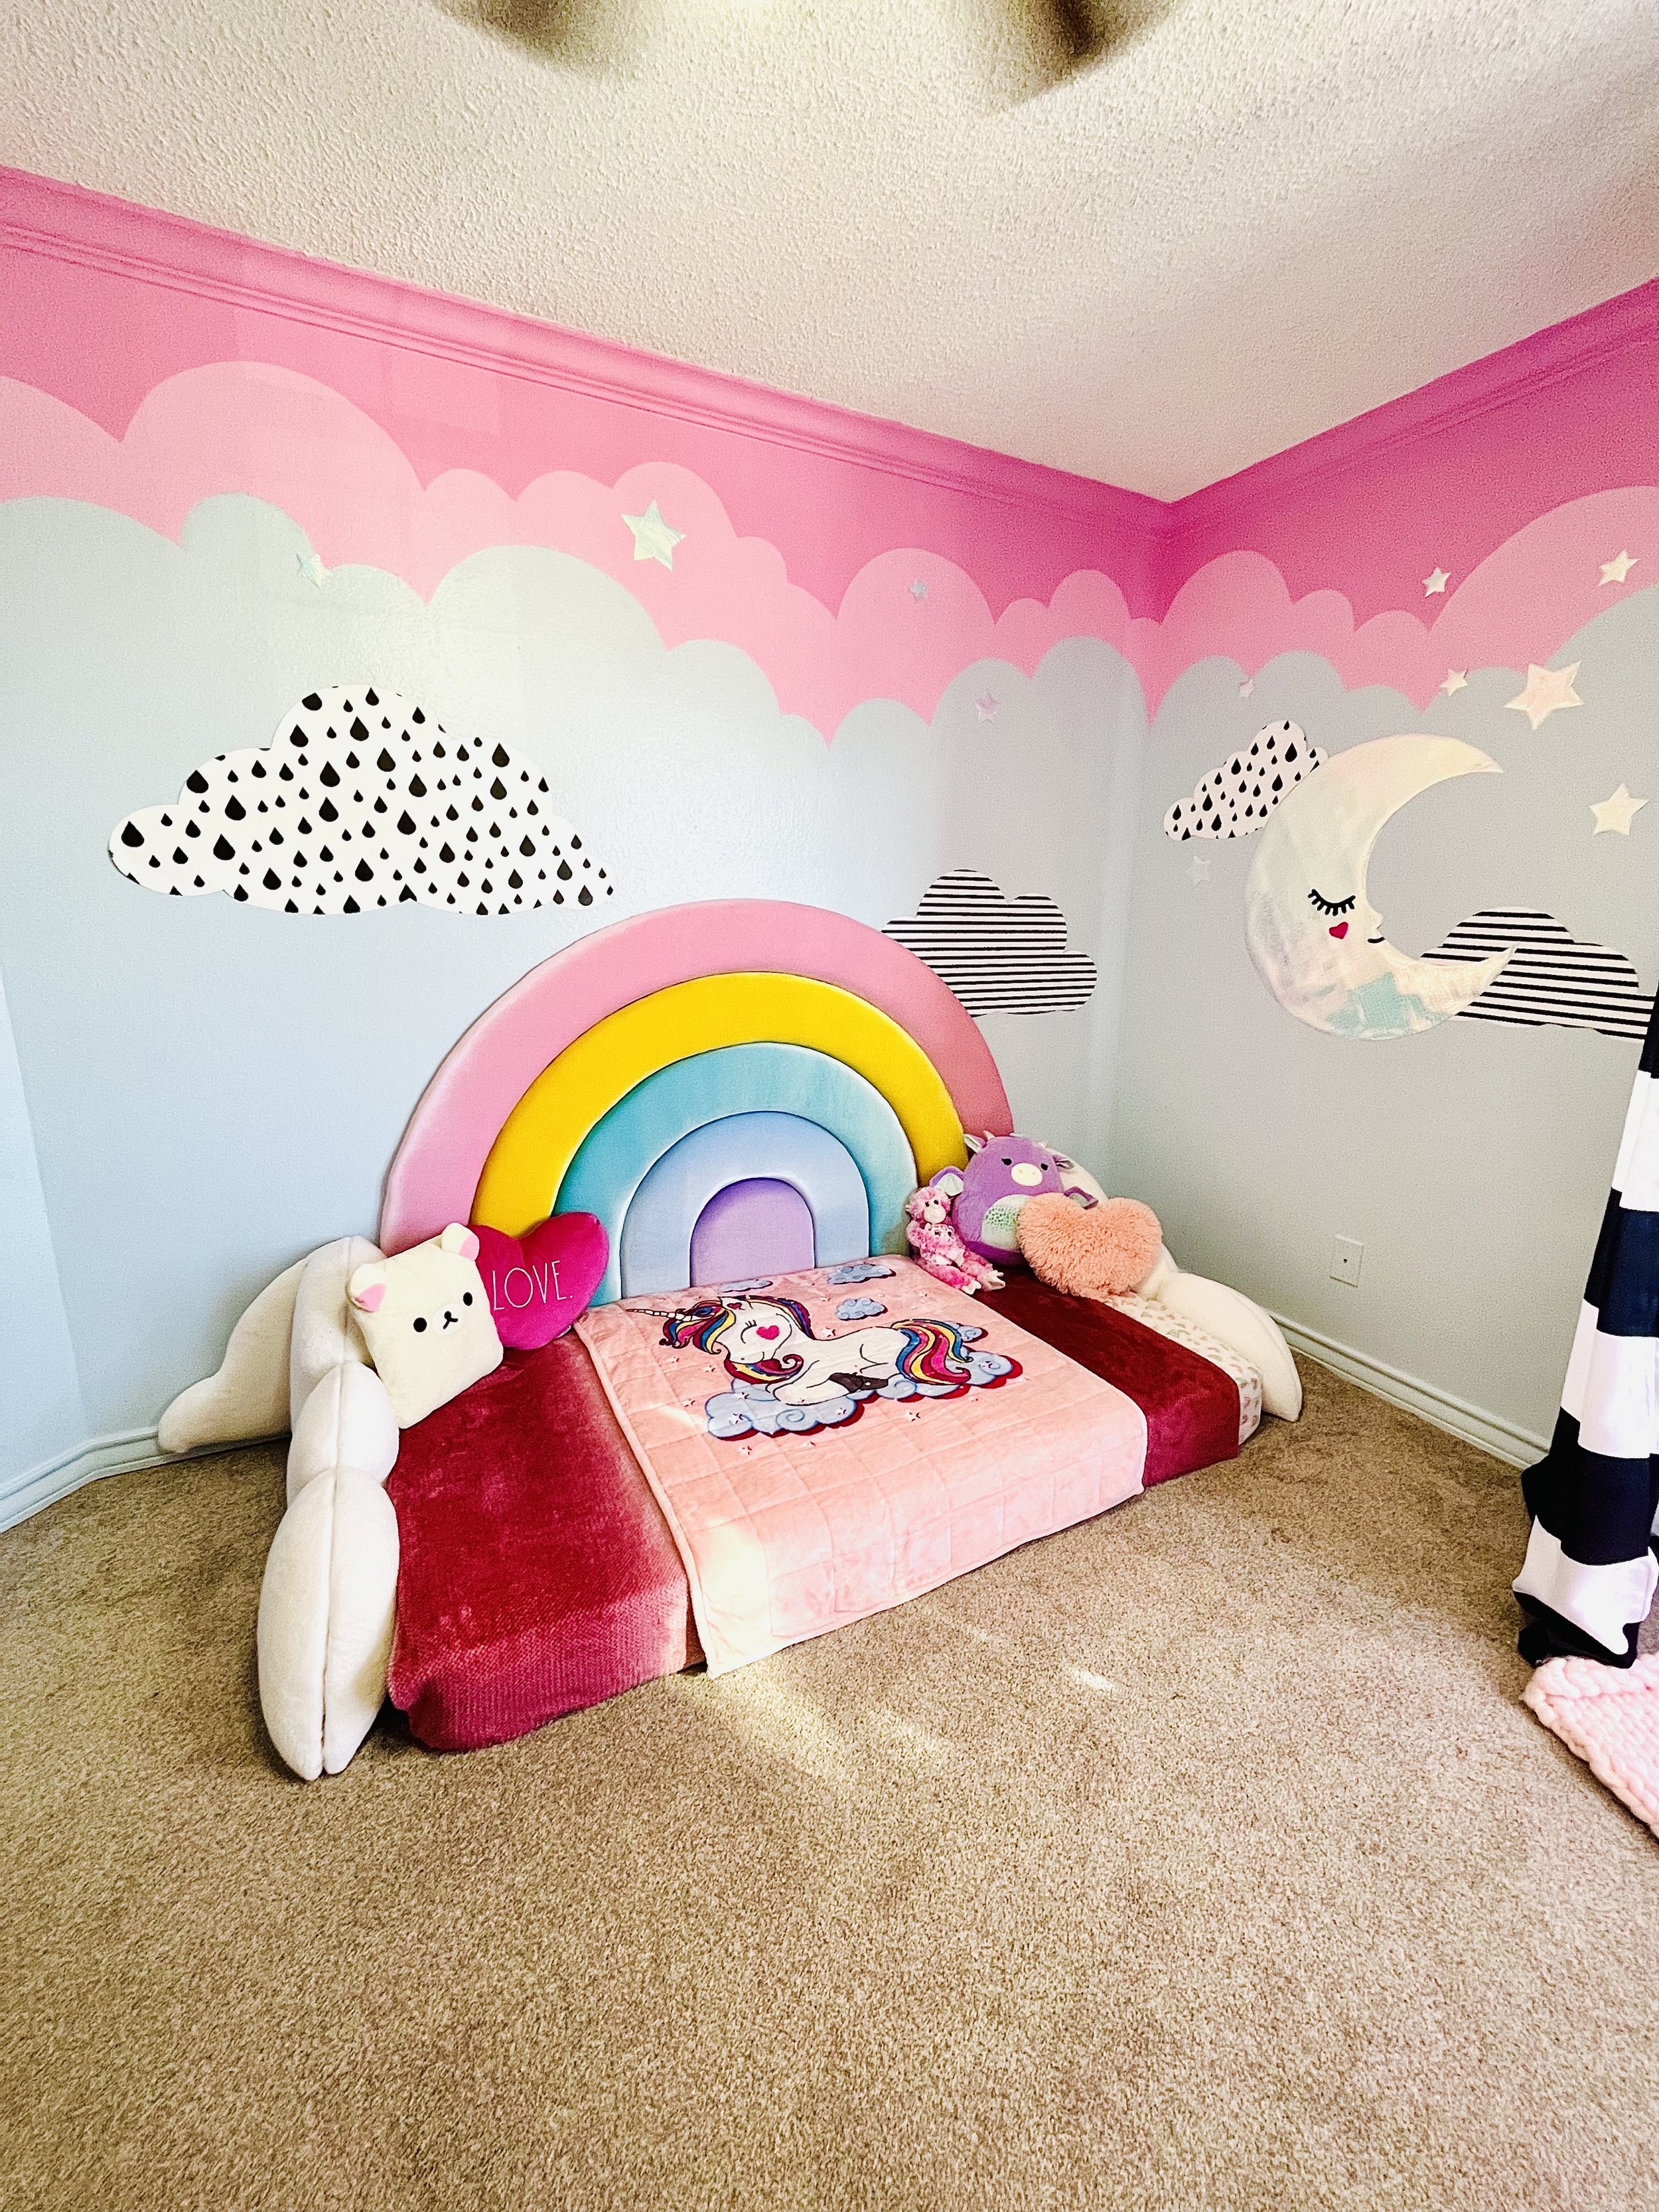
I wanted it taller, than the curve, so the mattress didn’t cover too much of the rainbow. I raised it 12” So total height is 49.5.
Note: A standard piece of wood/mdf/hardboard is 48” so adjusting accordingly would be required to use a more sturdy substrate, at least for the backing. I was going for low budget, light weight, and easy to cut.

Step 2: Cut. I put a screw in the center point, connecting the cardboard strip (makeshift giant protractor) to the cardboard substrate. At the other end, I poked a hole in the cardboard strip, just enough for a pen to poke through. I drew it out in pen first, to make sure the curves were lining up correctly. I followed the same path with an exacto knife, first to score, then to cut. I couldn’t believe that nothing went off kilter.

Step 2. Add Foam. 1” mattress topper (I got a “full” size) was not only cheaper than foam from from the craft store, but is also the exact size! Amazon to the rescue, $20.
I laid out the foam on the floor and traced each of the cardboard pieces with a sharpie. It’s thin enough to cut with good scissors but an electric knife would have been much easier. The edges don’t have to be perfect because they will get smooshed down with fabric and batting. I secured the foam with a bit of hot glue. It only needs enough to hold in place; a few blobs every 6” or so.
Note: I opted NOT to use spray glue because it can warp the cardboard, make a mess, and create too many fumes for an indoor project.

Step 3. Add batting.
Trace the shapes with the cardboard, leaving a few inches of excess around the perimeter. I used hot glue at this stage, thinking it would give a little extra structure to grab the fabric’s staples. I also didn’t want to abuse the cardboard with too many staples at this stage.
Note: This step is where you’re creating the shape, so it is important to used the same amount of tension along all of the edges or it will be bumpy and wavy. I did it by feel, trying to pull the same amount all the way around. You can go back and fix the bumps as they appear by sort of sculpting the batting. The fabric will fix minor bumps, but not large ones. I’ve got some, but didn’t notice them in person. They show up more in some of the pics.

Step 4. Add fabric.
Stretchy velvet is a must for this project as a stiffer upholstery fabric will want to pucker to get around the curves, especially on cardboard where you can’t pull too hard.
Trace the fabric again, leaving plenty of excess, then flip and straighten out. While the stretch is perfect for the curves, it can also cause you to go off course, so I put a few staples in to tack the whole thing in place, kind of like you would with sewing pins. one on top center first, and working down.
Note: I used a bosch electric stapler because as it doesn’t require pressing too hard (possibly crushing the cardboard) like a normal handheld might. I also didn’t use my air compressor upholstery gun as I thought it might blow through the cardboard. You can change the air pressure, but it all seemed a bit much. This was perfect.


Step 5: Attach to substrate.
Stronger than I expected, standing up. You could glue these to the wall at this stage. I felt they needed to be attached to another substrate. I chose cardboard as a large piece was only $6, from Office Depot. I also buy my large cardboard sheets at Uline, but they have minimums, usually 10 sheets. Cardboard worked because I knew i could just silicone caulk it to the wall, which peels off easily enough for my liking, and I am the one who will be sorting out the walls next. I different circumstances, I would have attached the cardboard arches to wood so that it could handled the same as any other headboard.
Note: I tried a few different glues and found that silicone caulk worked better than gorilla glue, which was dangerously close to seeping out and getting on the fabric.. I weighted it down and left it for a few hours. (I have 100% used my husband’s records to weigh things down, more times than we’ve ever listened to them)